Invisalign aligners are high in demand when it comes to teeth straightening treatment. Adults and teenagers enjoy the freedom of removing their aligners to eat. Unfortunately, food still gets stuck between teeth during the treatment. It’s essential to remove the food particles after every meal to avoid bacteria growth and tooth decay. Flossing is the best way to remove debris from between the teeth. The following information will guide you to flossing properly with Invisalign clear aligners.
Remove Aligners
Your first step to flossing is to remove your clear aligners. Chances are they are already out since you were eating. Avoid eating with your aligners in place because the chewing action can damage the aligners and interfere with the teeth straightening. It’s wise to soak your aligners while you eat to assure they are clean and bacteria free.
Brush
Brush your teeth after every meal to remove food particles. You most likely already know that brushing doesn’t fully get the job done. Even if you brush the recommended two minutes, there are still food particles stuck between teeth that bristles just can’t reach. However, brushing removes a large percentage of debris.
Rinse
Swish water or mouthwash around your mouth to break the food particles loose. Chances are you will be surprised at the result and how much food particles were left behind after brushing. Always rinse thoroughly and repeat as many times as necessary.
Floss
Flossing involves a thin string that glides between teeth and removes food particles, sugar, plaque, tartar, and bacteria. Have you ever brushed properly, rinsed and flossed only to find more particles. If you are wondering if bacteria and plaque really grow fast in between your teeth, try smelling the dental string after flossing. The odor you smell is already the beginning of bacteria buildup and growth.

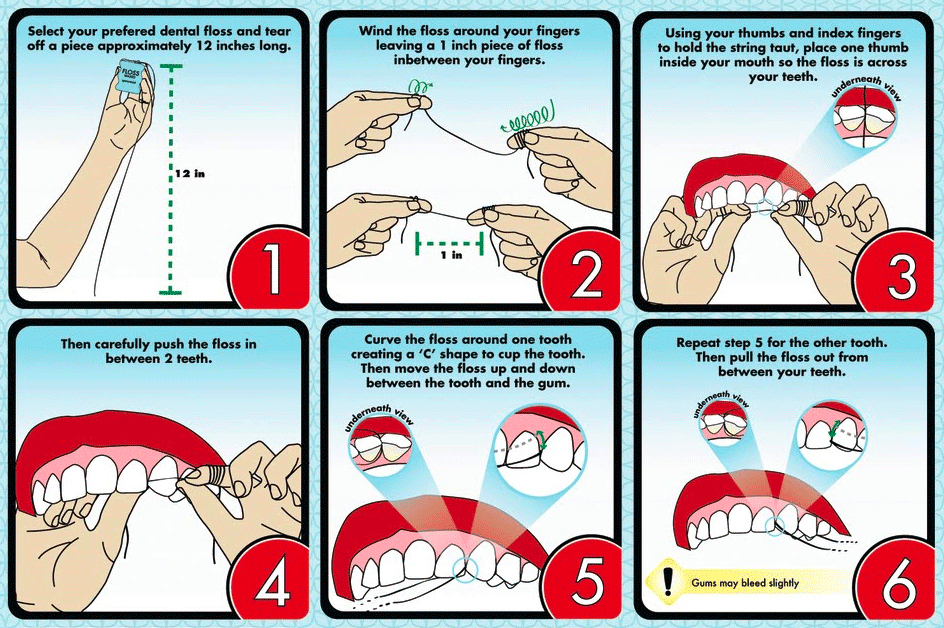
Steps to Flossing Properly
Step 1
Choose a flossing brand that smoothly glides between your teeth. There are a variety of choices such as plain, waxed and ribbon. You can even find mint flavored dental floss.
Step 2
Remove a long piece of dental floss. The recommended amount is about 18 cm. This might seem too long, but you need to the extra room to hold the floss.
Step 3
Wrap the ends of the dental floss around your fingers leaving a few inches of the floss to work with between your teeth.
Step 4
Glide the floss between your teeth and slowly up towards the gum line.
Step 5
Work the floss between the teeth by creating a “C” with the floss and using an up and down motion.
Step 6
Once you are done with one tooth move the dental floss between your fingers to reveal a clean section then move to the next tooth. Continue to do so until you have flossed between all of your teeth.
After you finish flossing it’s time to place your Invisalign aligners back into place. Flossing at least once a day is recommended to prevent tooth decay and gum disease.
Are you ready to start your Invisalign treatment with clear aligners? Contact us now for an appointment!
 Dr. Jacquie Smiles began her career in orthodontics dentistry at Boston University and became the first female Director of B.U.’s Predoctoral Orthodontic Department. Since then she has become an expert in orthodontics and opened several offices in New York and New Jersey.
Schedule Your Invisalign Appointment
Contact us today for your no-obligation Invisalign appointment in NYC. You may also call Dr. Jacquie Smiles at 212-972-3522. Our office is conveniently located near 30 East 40th Street Park Avenue, New York, NY 10016.


